Headlight relay harness installation
Click on a picture for a really big one.
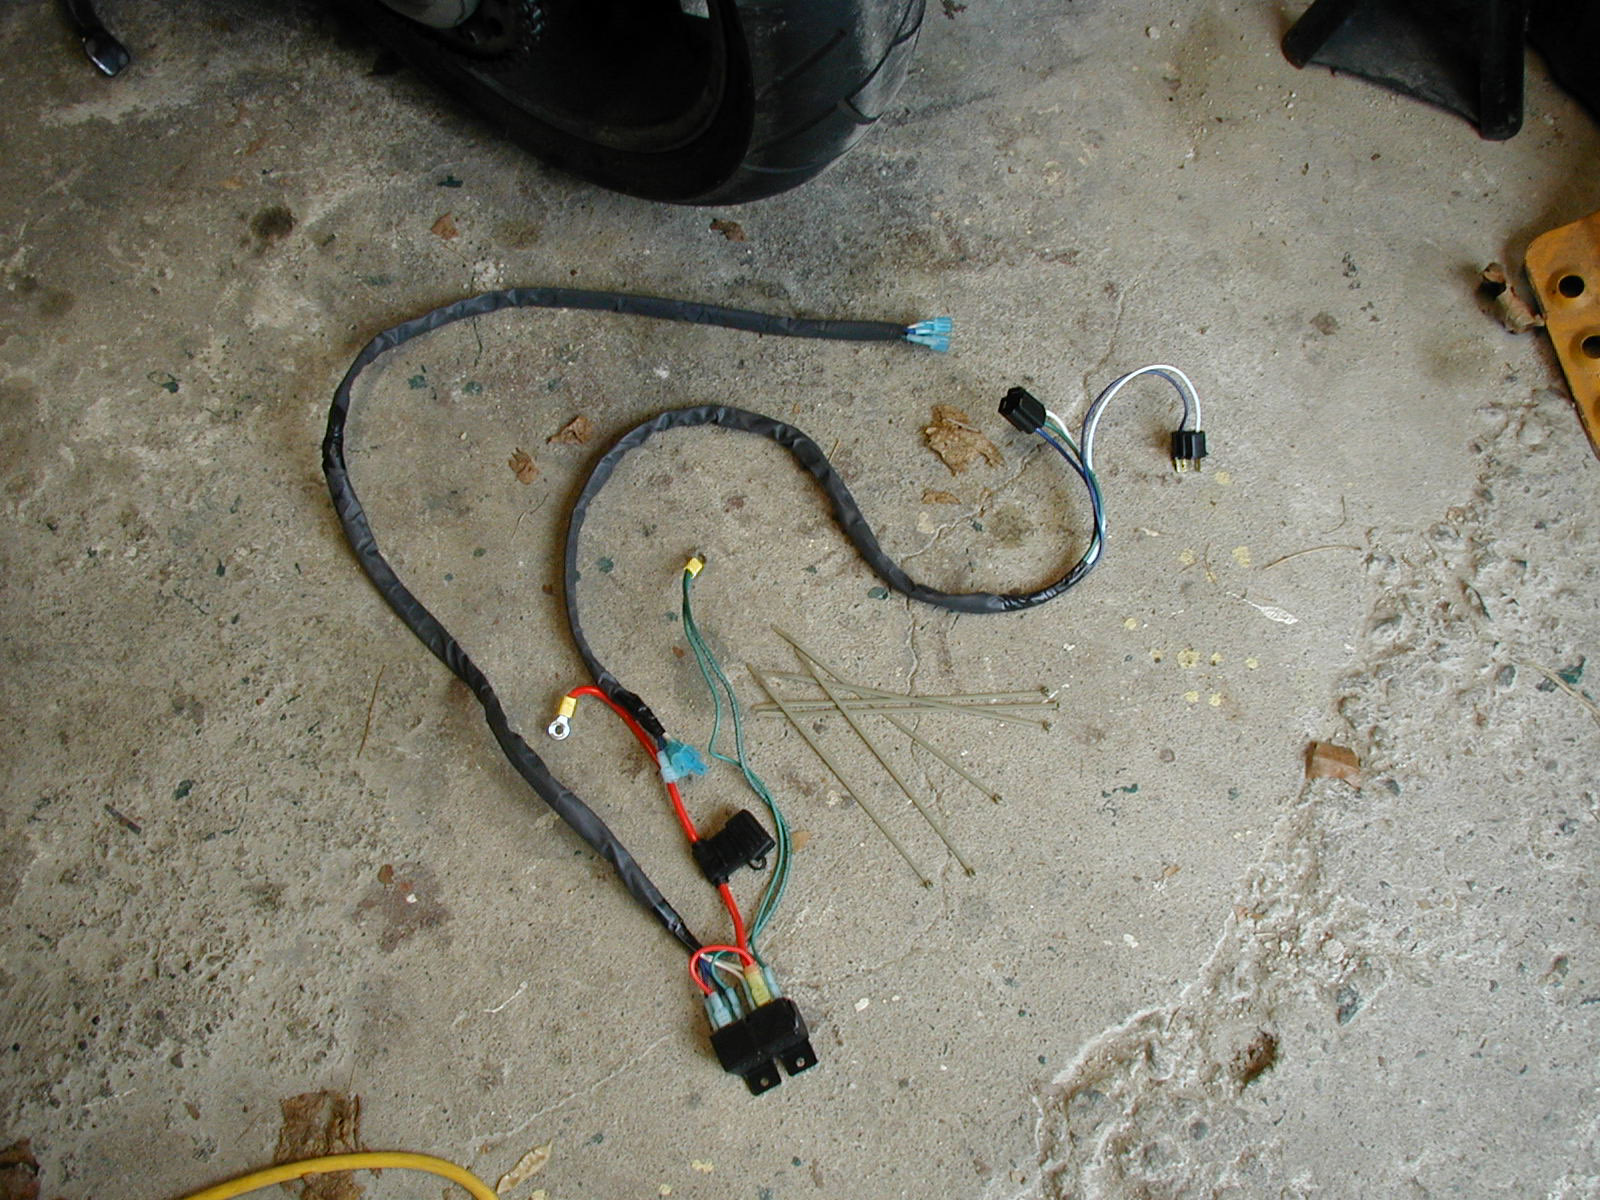
Parts list:
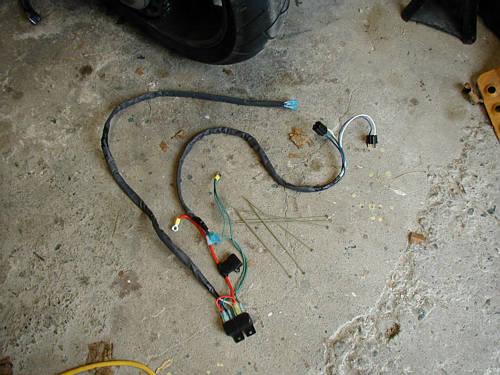
Wiring harness in two parts
a bunch of cable ties
 Remove the following:
- seat
- fuel tank
- rear cowling
- battery cover (if you have one)
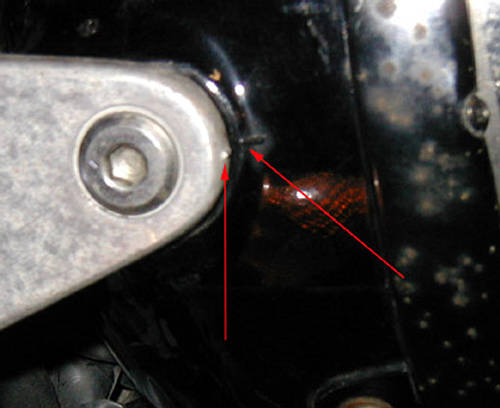
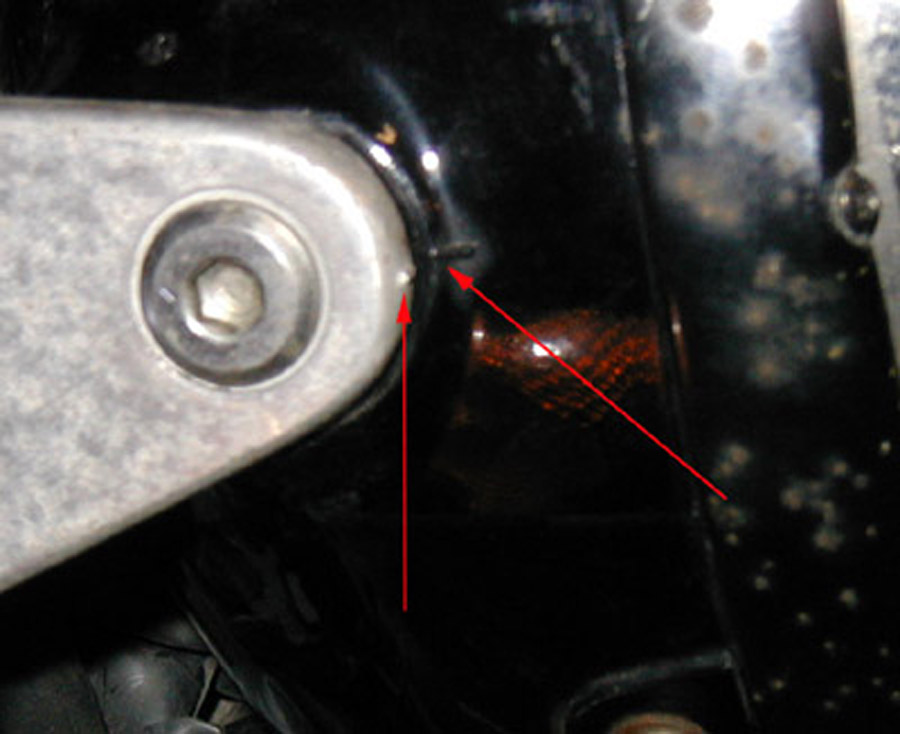
Take note of the aim of the headlight using the little marks on the headlight
bracket (see picture), you're going to have to re-aim the headlight afterward,
and this will make it easier.
Remove the following:
- seat
- fuel tank
- rear cowling
- battery cover (if you have one)
Take note of the aim of the headlight using the little marks on the headlight
bracket (see picture), you're going to have to re-aim the headlight afterward,
and this will make it easier.
 Remove the headlight lens and loosen the headlight mounting bolts on the sides
so the headlight can move up and down. You'll need to wiggle the bucket around
to get the cables in, and having the headlight loose will make it easier.
Thread the blue plugs of the part that doesn't have the relays through the hole
in the headlight bucket from the inside and pull it through so the srinkwrap stops
at the hole (more or less)
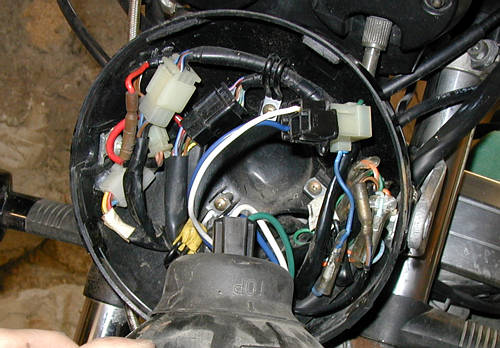
The new harness has two connectors that should be bleeding obvious where they go.
Make sure that the one with the male plugs gets oriented properly, with the colors
matching up, and the plug tines matching, even the empty space.
The other one goes on the headlight (duh)
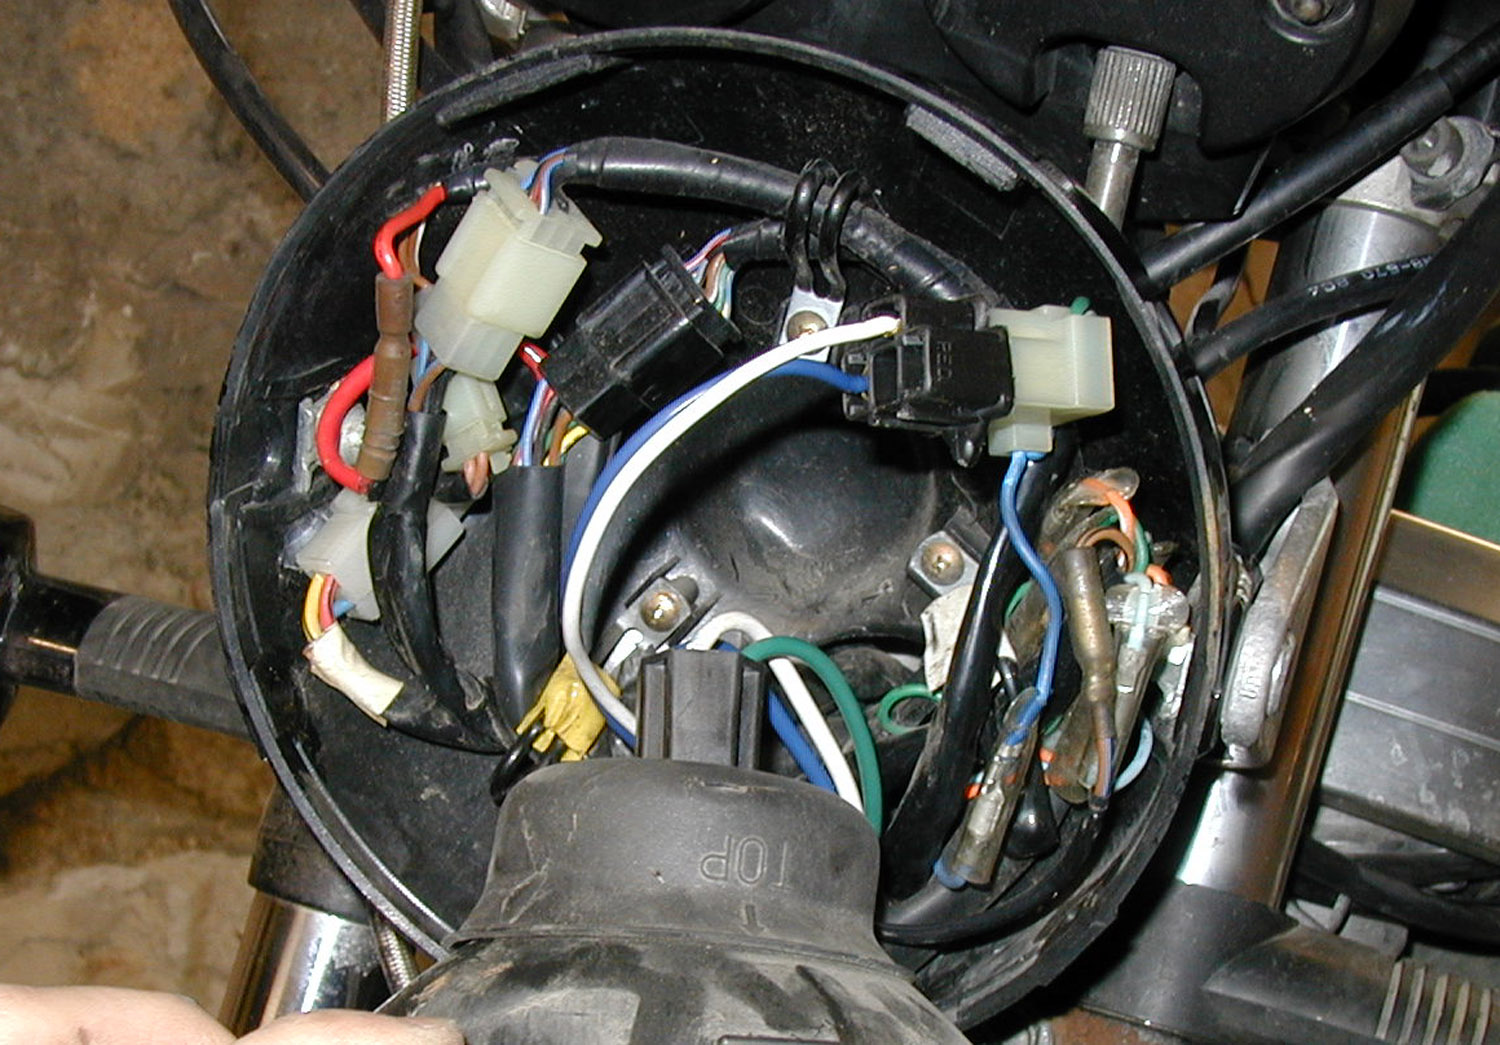
There isn't a lot of space inside the headlight bucket so you'll have to do some
masaging to get all the stuff inside and the reflector back on.
NOTE: The new female plug is especially tricky, there's only barely enough space
so you have to make sure that the three wires coming out of it don't cross or the
added thickness will prevent things from fitting. make sure they're flat on the edge
of the plug.
Remove the headlight lens and loosen the headlight mounting bolts on the sides
so the headlight can move up and down. You'll need to wiggle the bucket around
to get the cables in, and having the headlight loose will make it easier.
Thread the blue plugs of the part that doesn't have the relays through the hole
in the headlight bucket from the inside and pull it through so the srinkwrap stops
at the hole (more or less)
The new harness has two connectors that should be bleeding obvious where they go.
Make sure that the one with the male plugs gets oriented properly, with the colors
matching up, and the plug tines matching, even the empty space.
The other one goes on the headlight (duh)
There isn't a lot of space inside the headlight bucket so you'll have to do some
masaging to get all the stuff inside and the reflector back on.
NOTE: The new female plug is especially tricky, there's only barely enough space
so you have to make sure that the three wires coming out of it don't cross or the
added thickness will prevent things from fitting. make sure they're flat on the edge
of the plug.
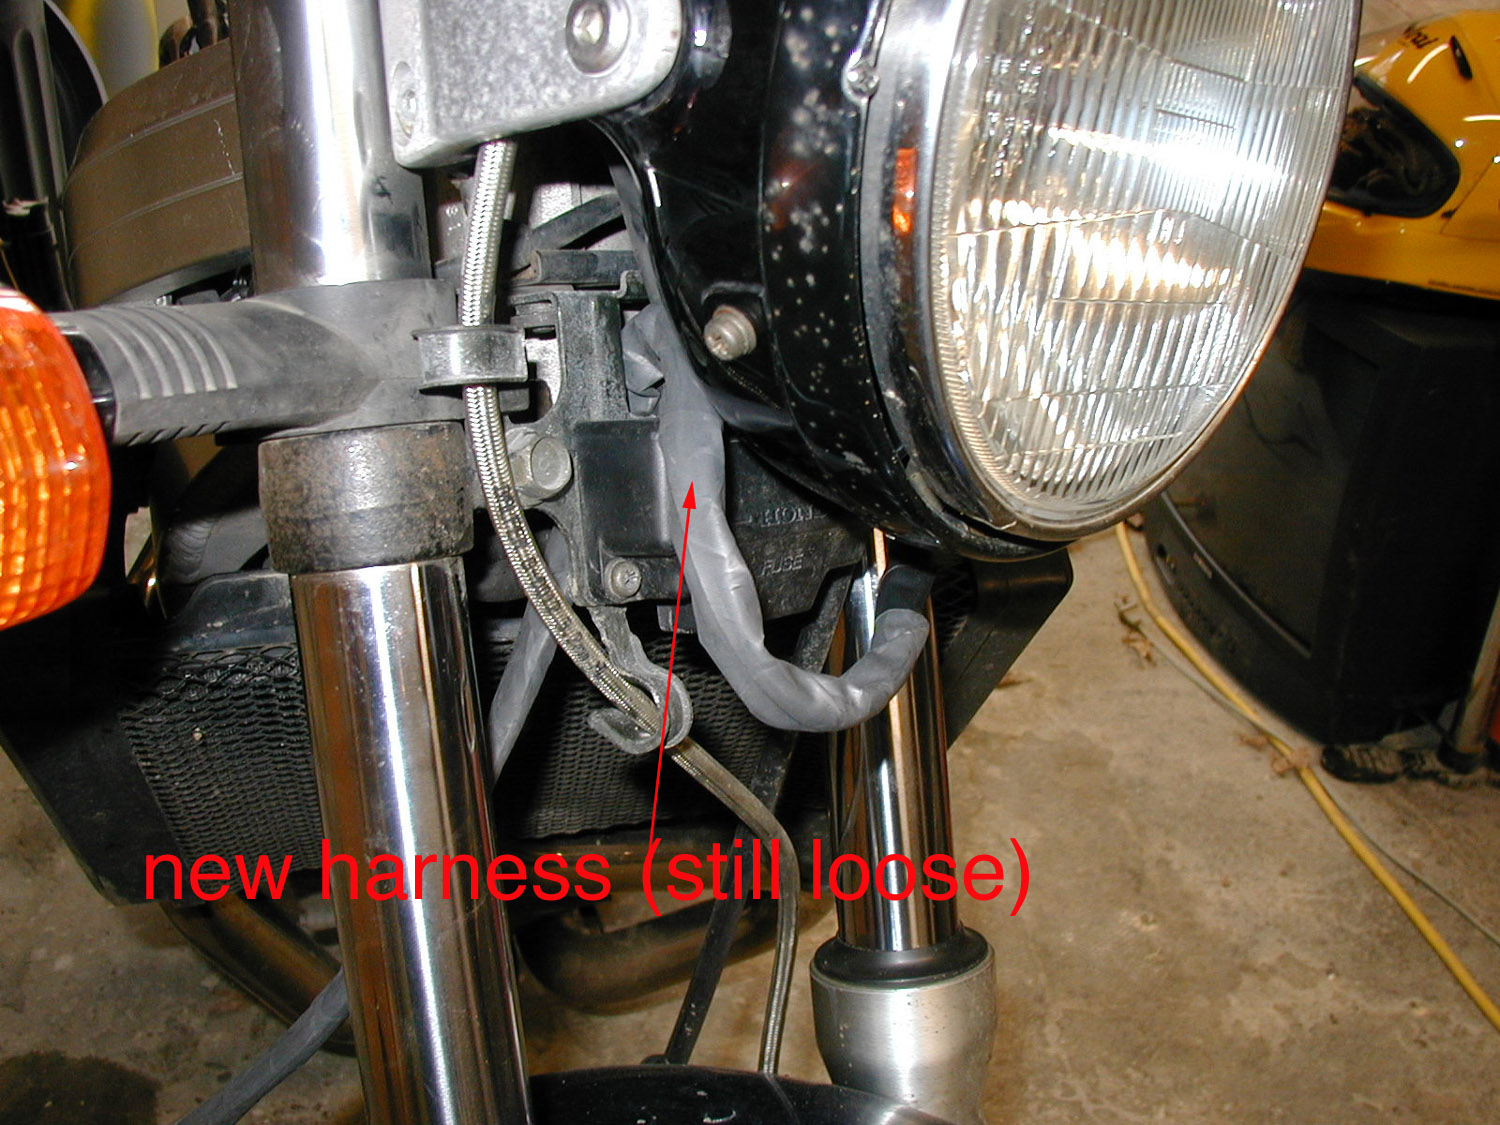
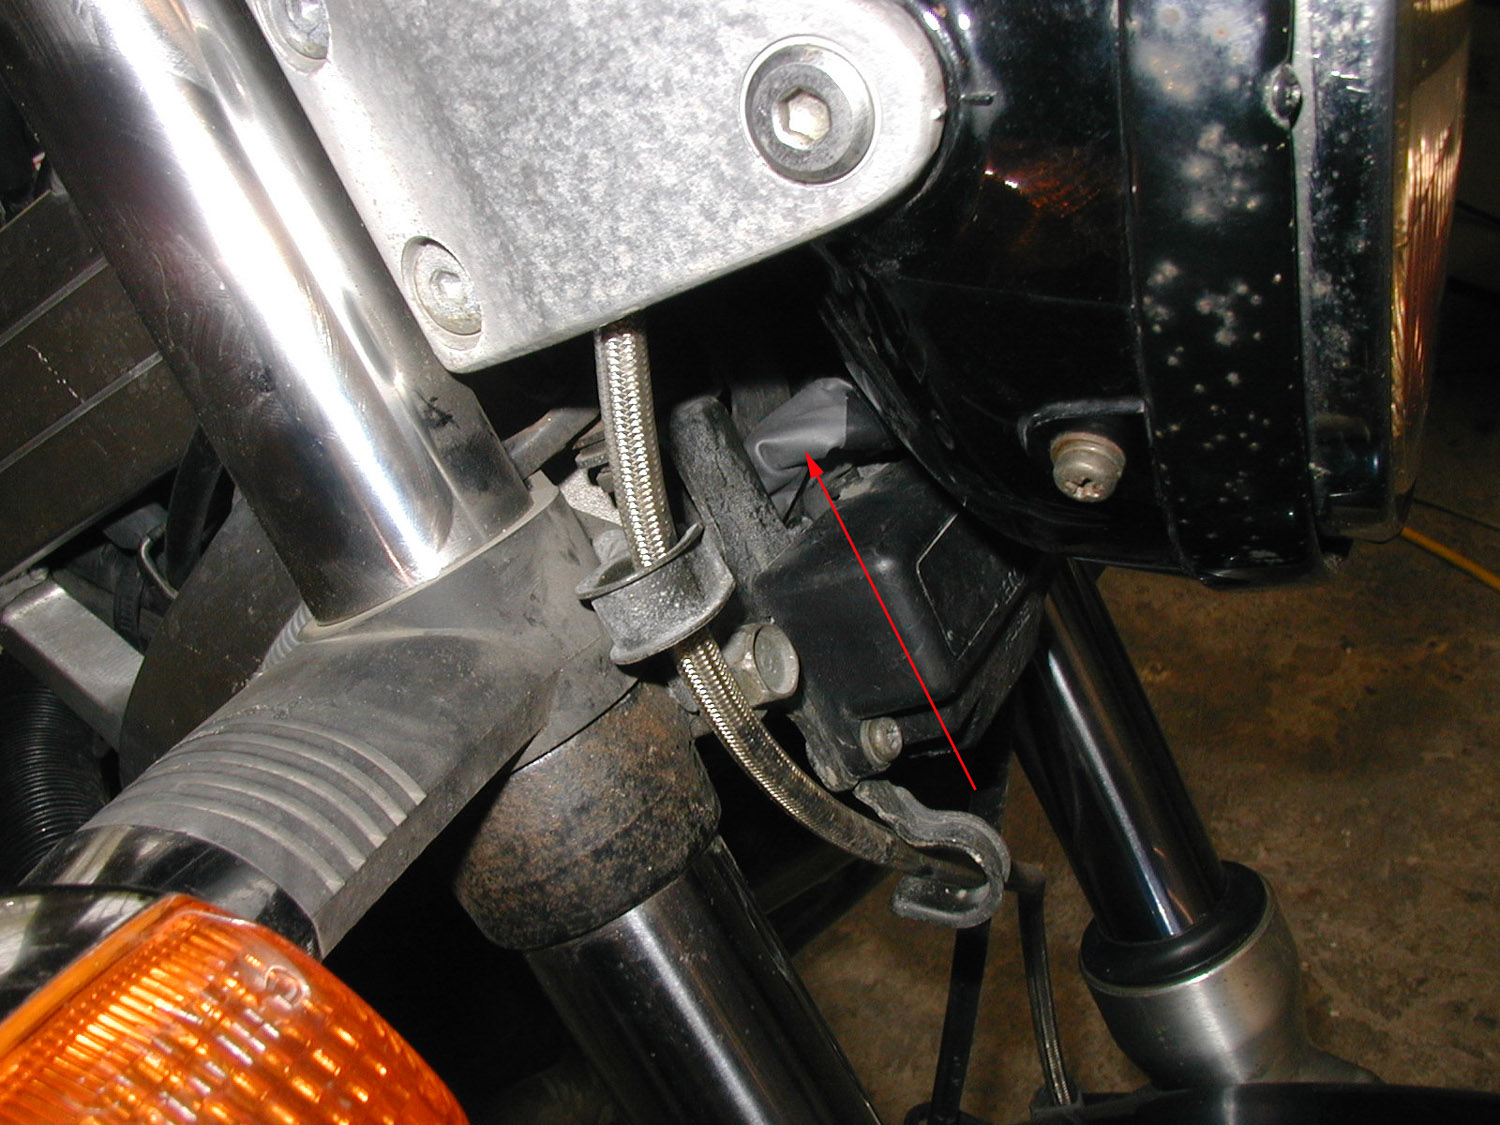
 I did it like this and it worked, you may find that a different routing works for you,
but it's a good place to start.
DON'T FORCE THINGS! The bucket is plastic and can crack if you ham-fist it. It will
all fit, but it takes some work. It's the second hardest part of the installation.
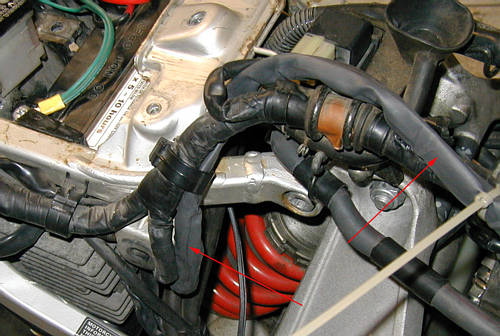
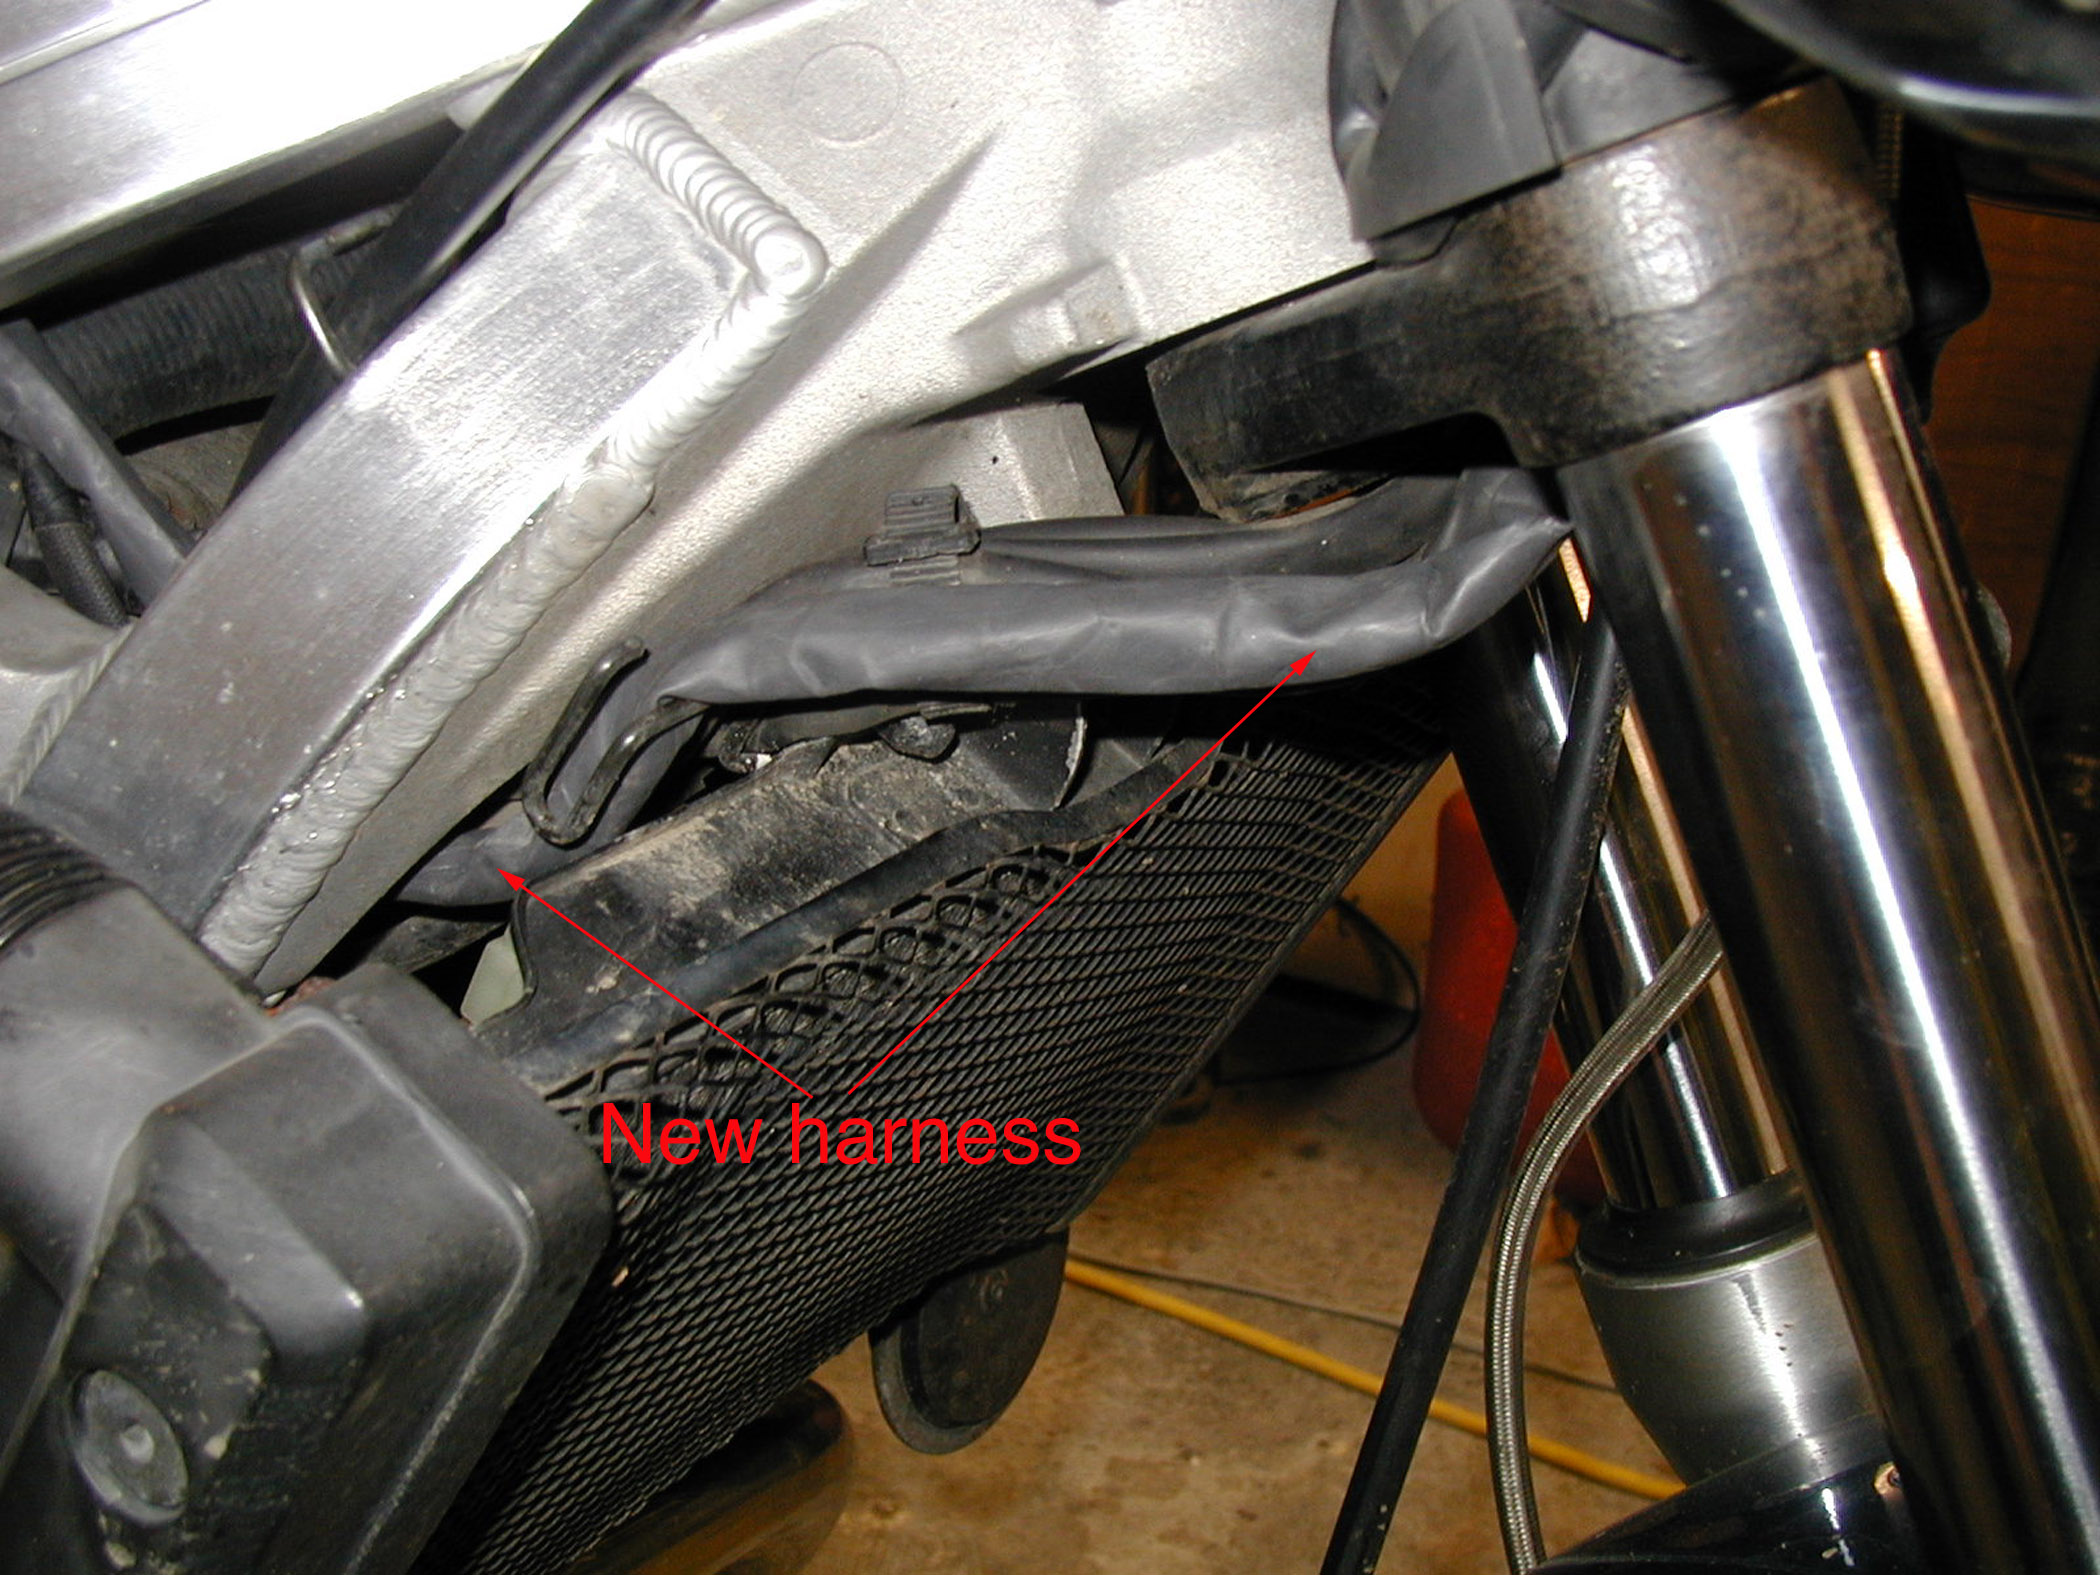
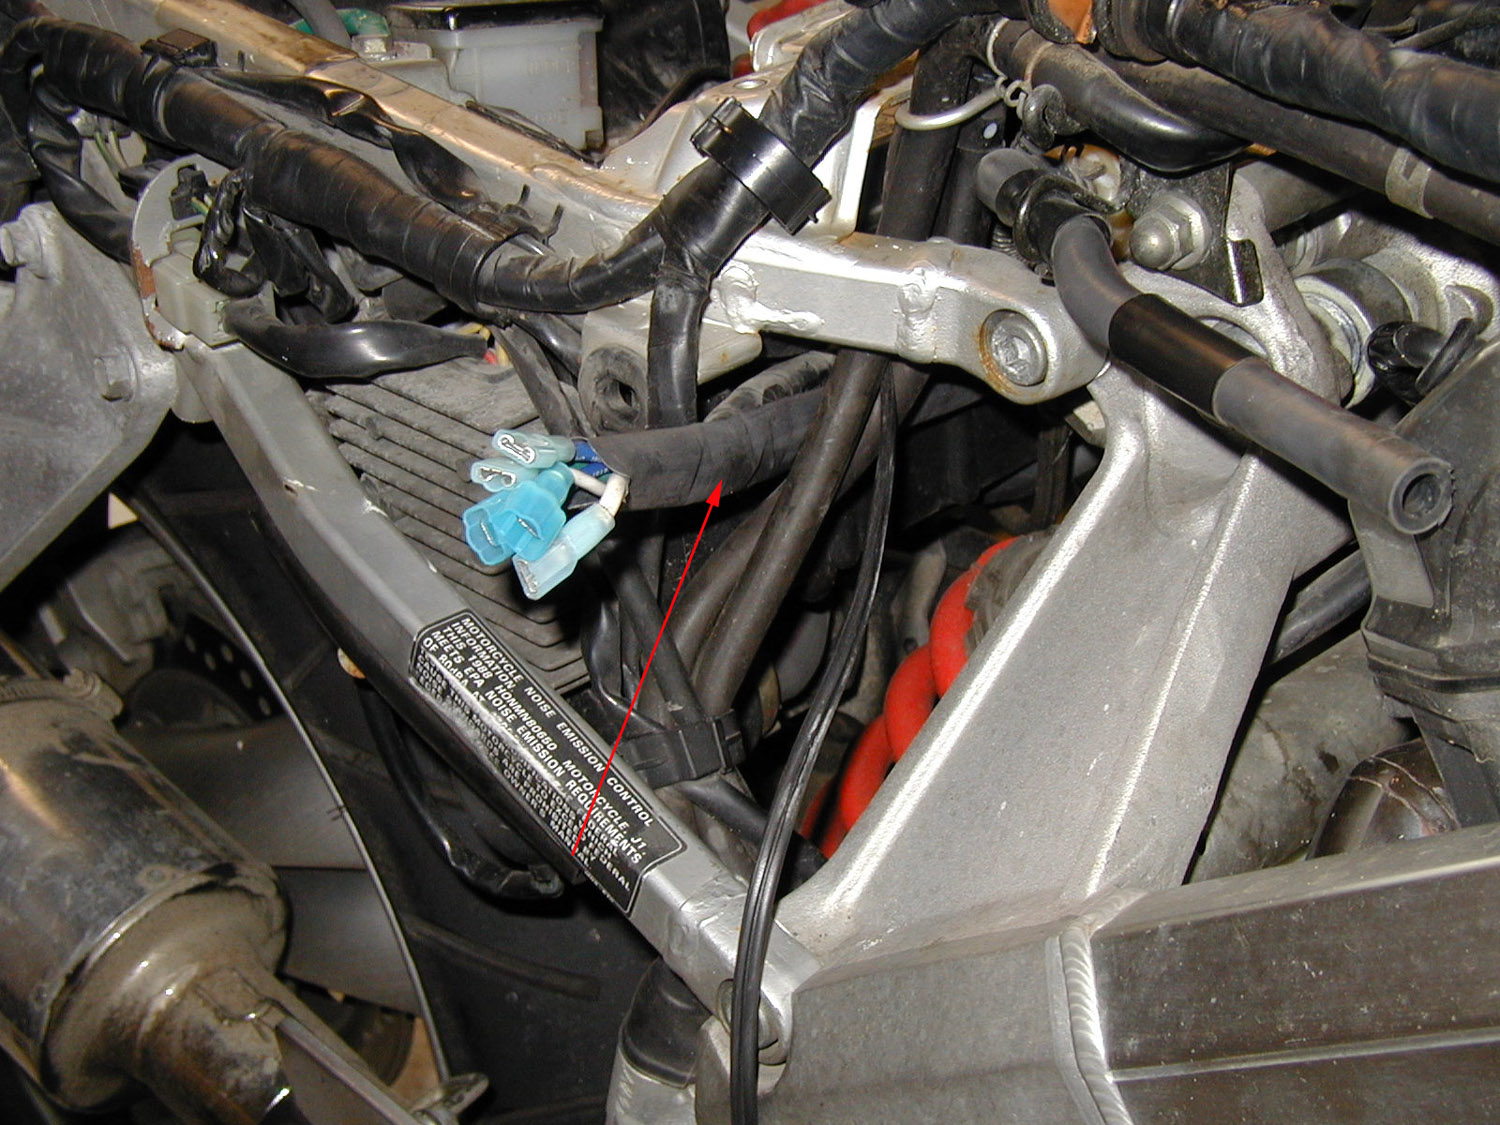
Next route the harness down along the rest of the harness to the right side frame rail.
This is the hardest part. I did it without removing any pieces, but I was sorely tempted.
I did it like this and it worked, you may find that a different routing works for you,
but it's a good place to start.
DON'T FORCE THINGS! The bucket is plastic and can crack if you ham-fist it. It will
all fit, but it takes some work. It's the second hardest part of the installation.
Next route the harness down along the rest of the harness to the right side frame rail.
This is the hardest part. I did it without removing any pieces, but I was sorely tempted.


 IMPORTANT:
Make sure that the handlebars can move back and forth without the harness interfering.
IMPORTANT:
Make sure that the handlebars can move back and forth without the harness interfering.
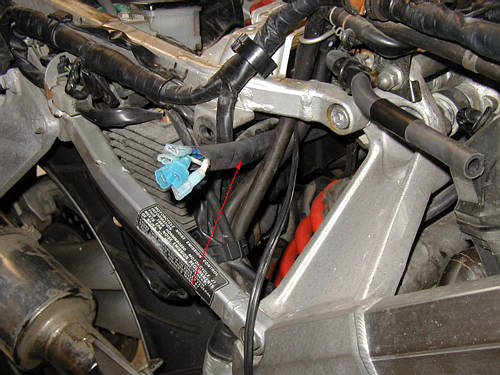
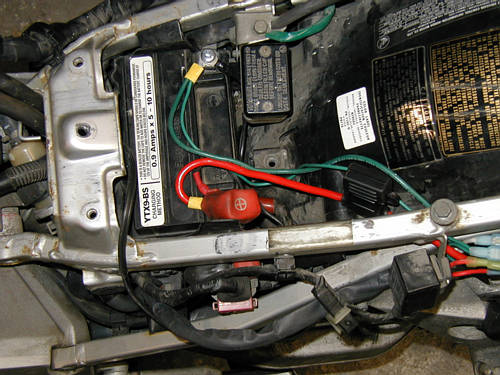
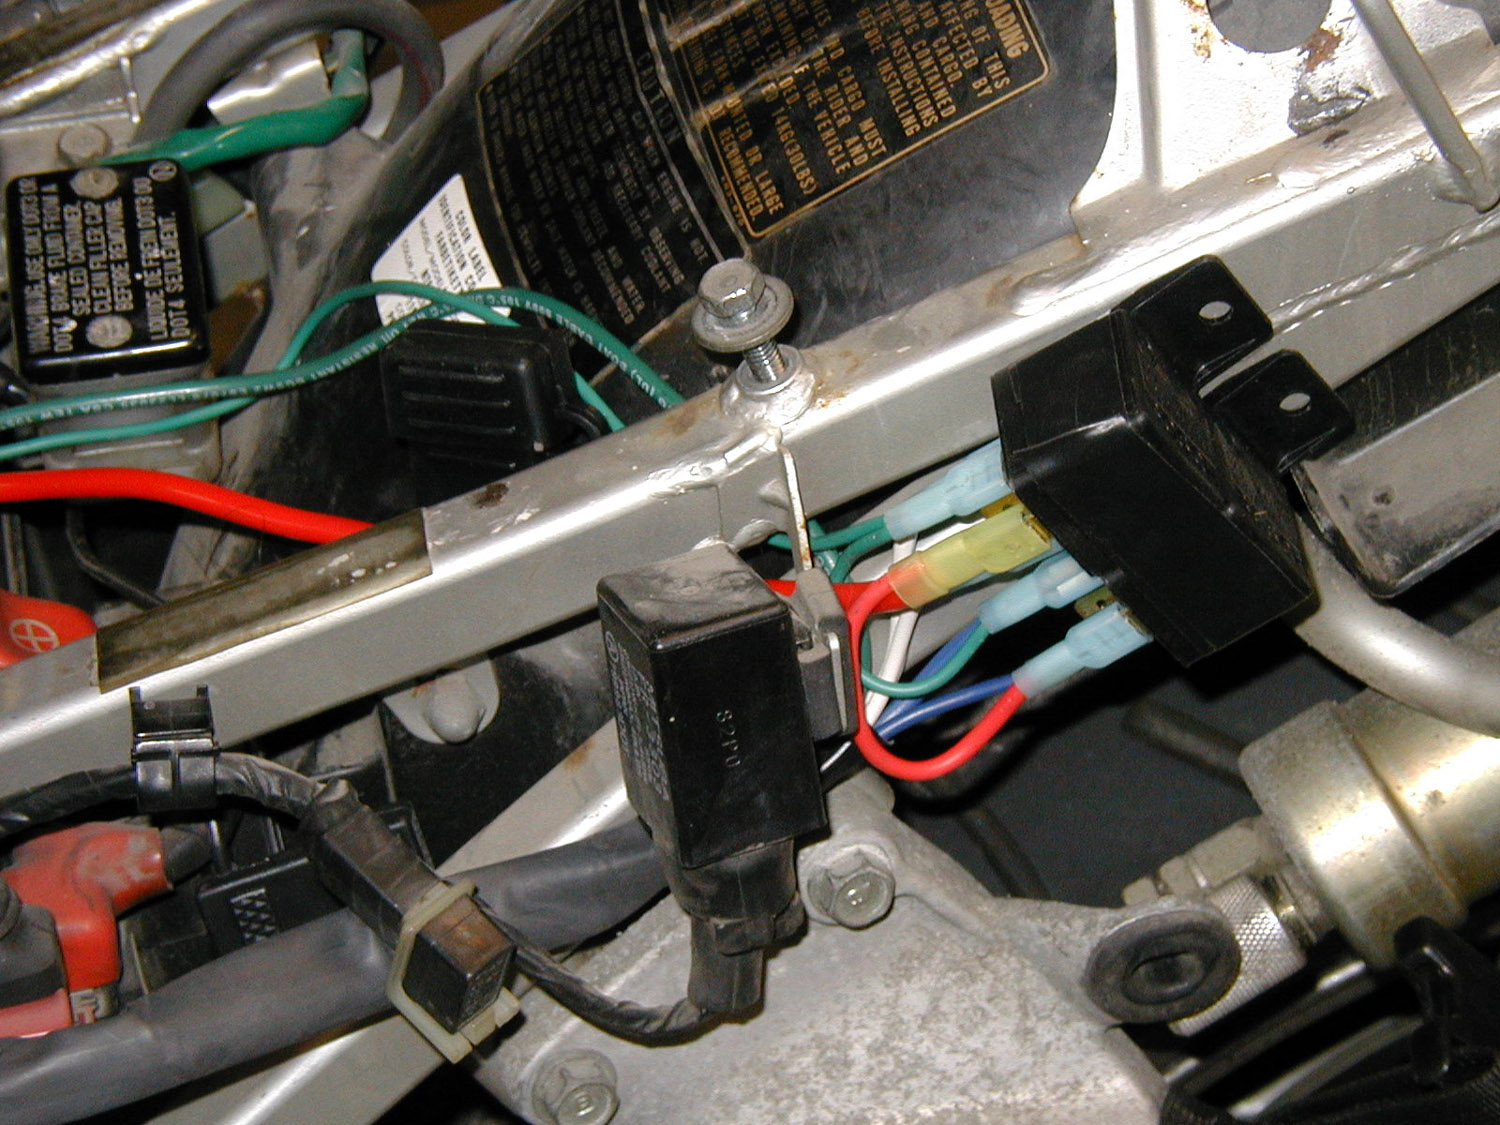
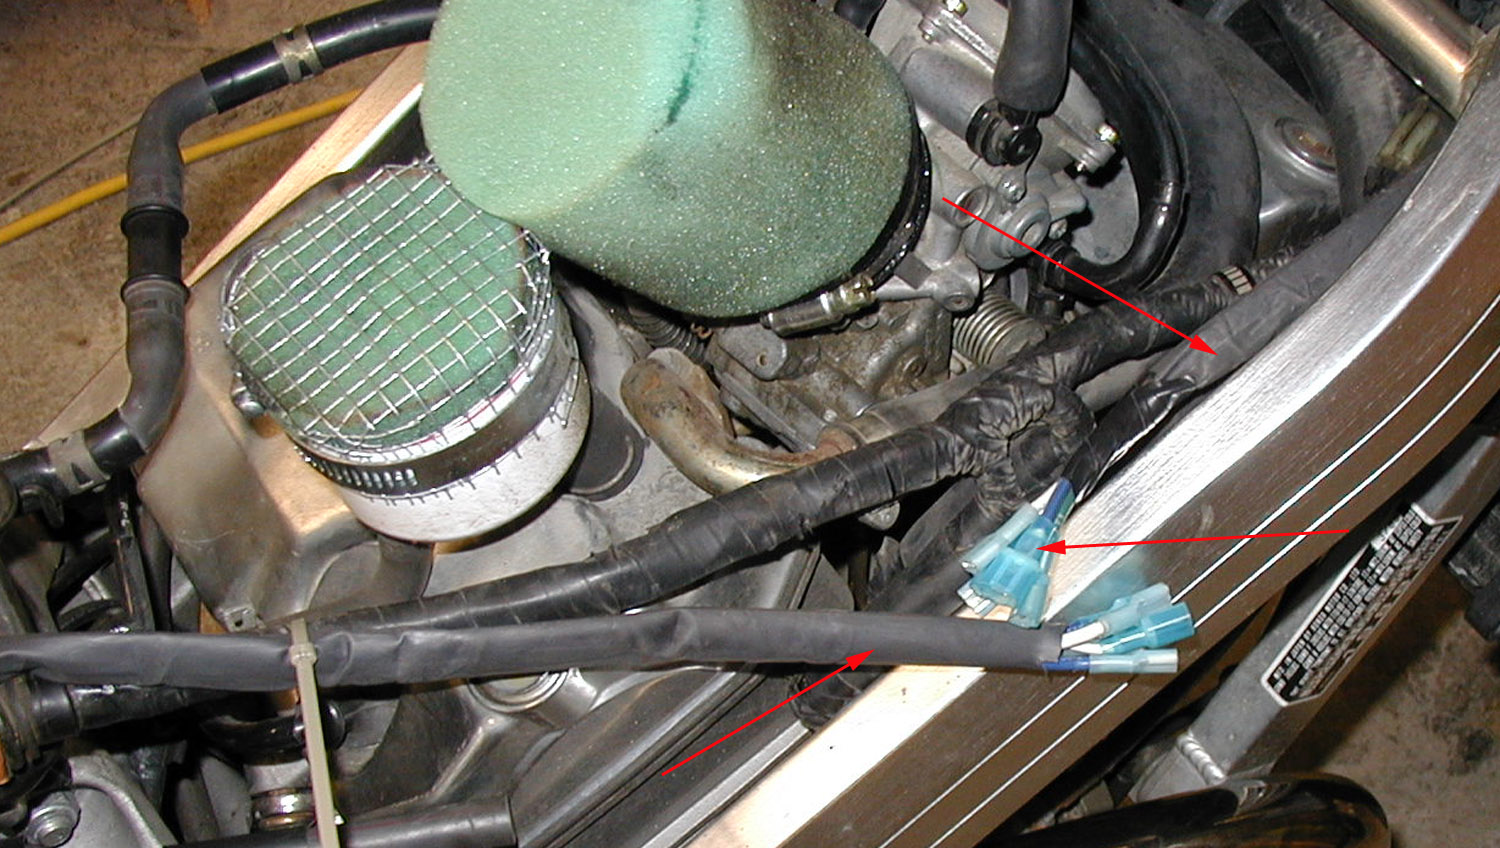
 The rear half of the harness is easier to route.
From the left side of the bike stuff the plugs along the existing harness in front of the
battery box. It should just go through. The relays should sit flat against the left
subframe rail, with the green and red wires going through the "V" in the subframe,
BEHIND the vertical bracket thingie. You might have to twist the fuse around to get
it to fit through the space.
It will look like this now:
The rear half of the harness is easier to route.
From the left side of the bike stuff the plugs along the existing harness in front of the
battery box. It should just go through. The relays should sit flat against the left
subframe rail, with the green and red wires going through the "V" in the subframe,
BEHIND the vertical bracket thingie. You might have to twist the fuse around to get
it to fit through the space.
It will look like this now:

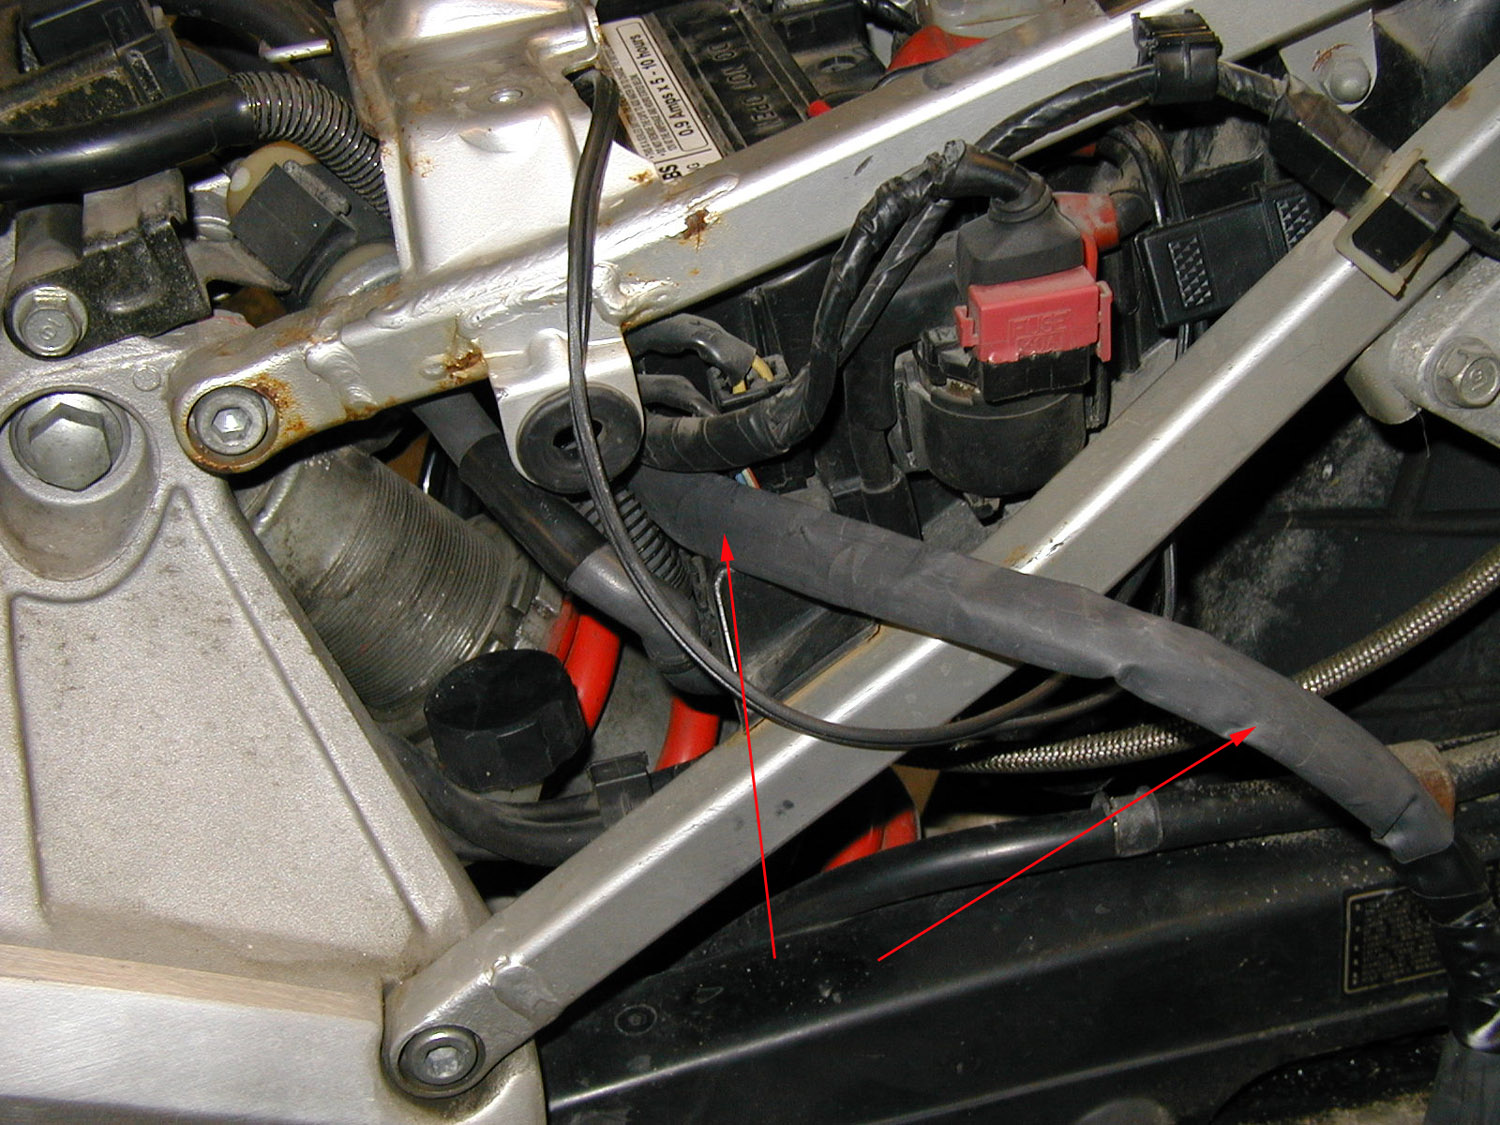
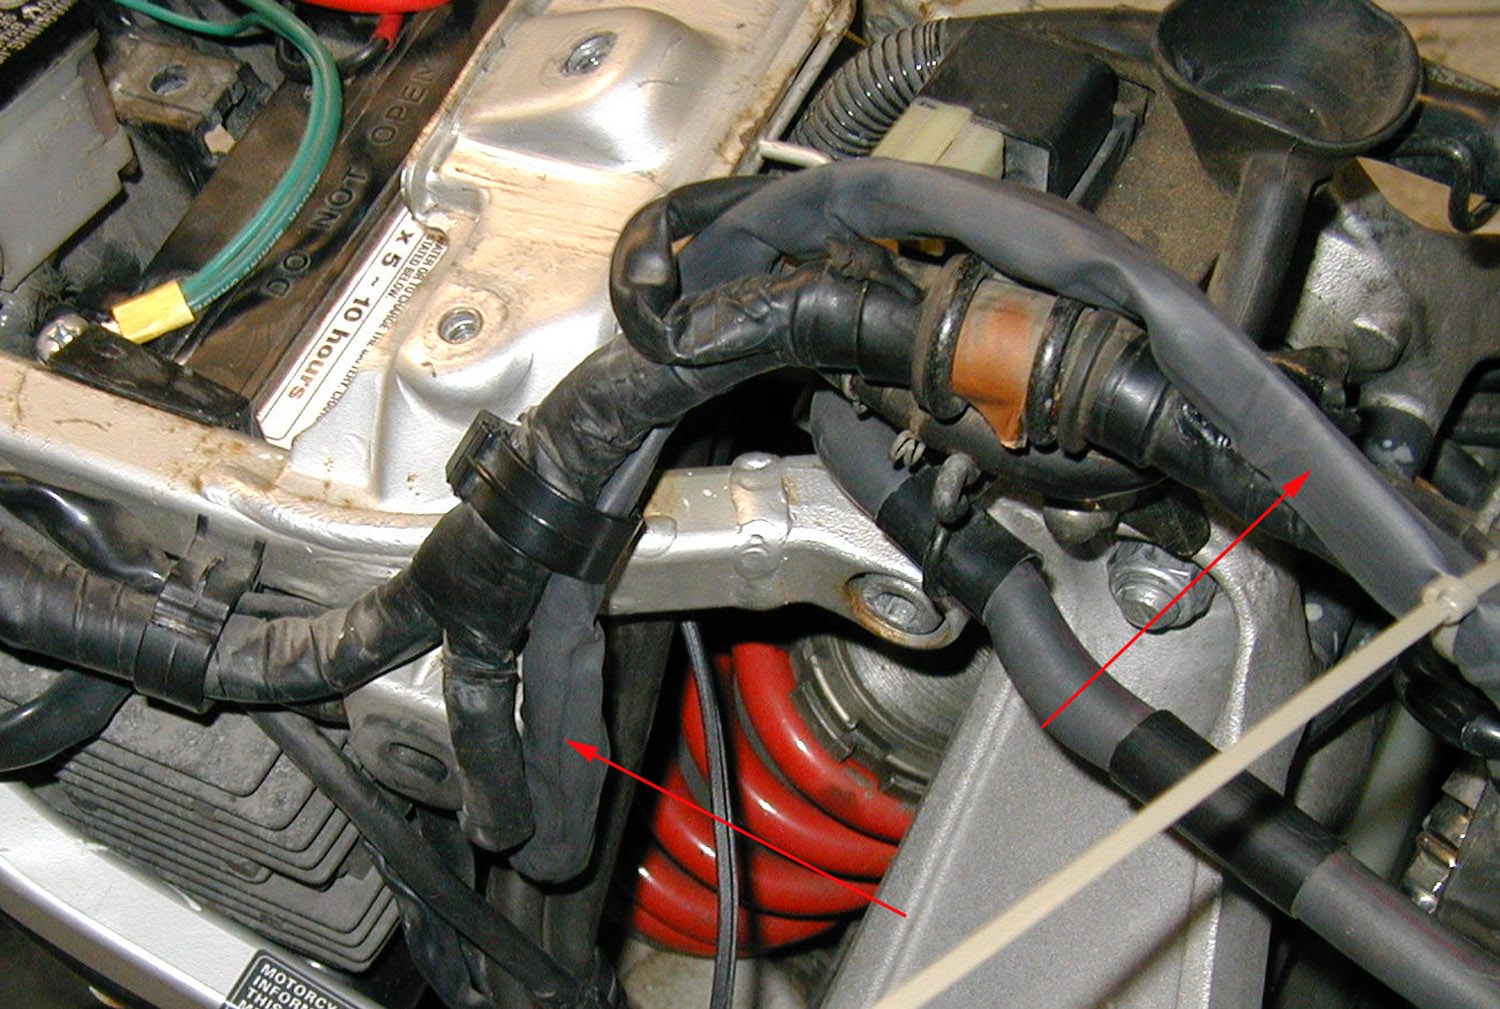
 Route the harness along the existing harness to the right frame rail where the front half
is waiting. I don't have an airbox, so I put mine on top of the existing harness, but
putting it underneeth should fit without trouble.
Route the harness along the existing harness to the right frame rail where the front half
is waiting. I don't have an airbox, so I put mine on top of the existing harness, but
putting it underneeth should fit without trouble.
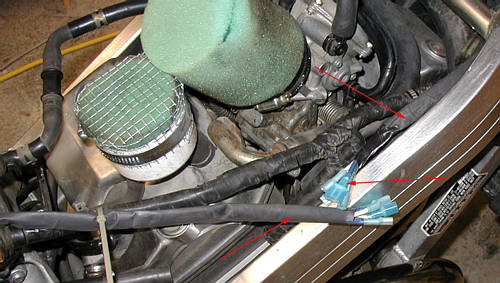 The front and rear plugs will fit together only one way, so long as you match up the wire
colors.
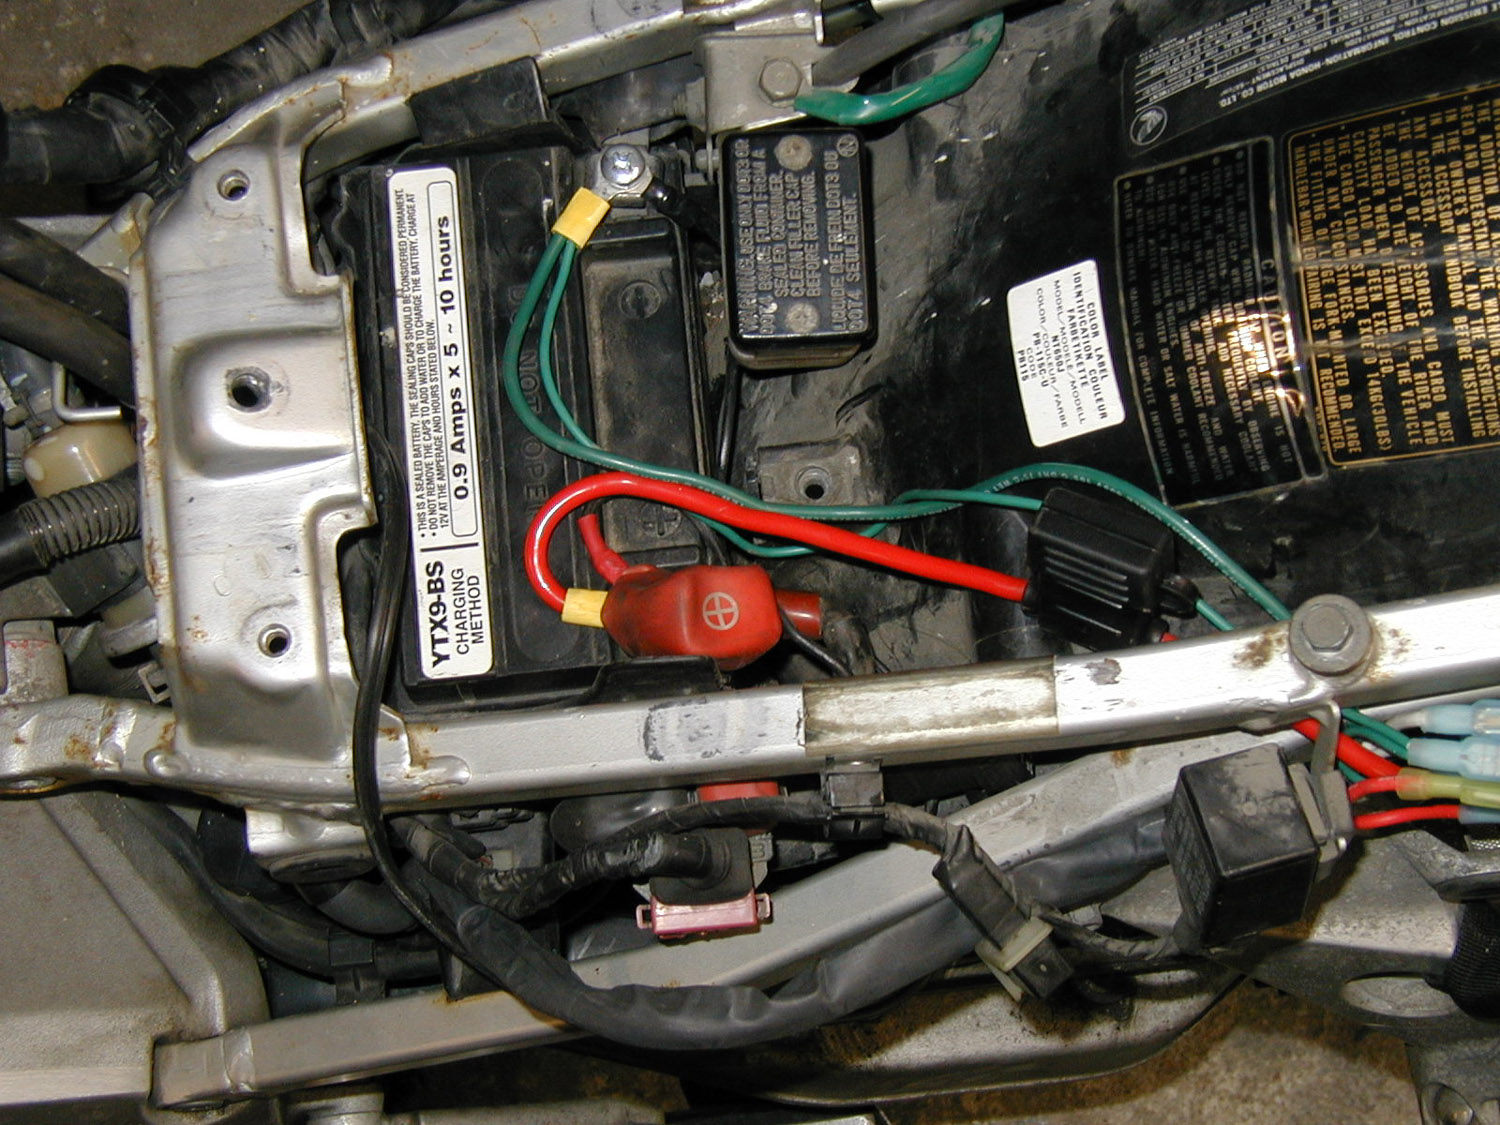
Attaching the cables to the battery is pretty straightforward, red to postitive, green
to ground/negative.
The next tricky part is routing the cables so they fit under the battery cover gracefully.
It's possible without cutting anything, but tricky. If you're willing to cut a notch in
your battery cover, it gets easy. It takes a bunch of wiggling to get it to fit right,
but it will fit.
The front and rear plugs will fit together only one way, so long as you match up the wire
colors.
Attaching the cables to the battery is pretty straightforward, red to postitive, green
to ground/negative.
The next tricky part is routing the cables so they fit under the battery cover gracefully.
It's possible without cutting anything, but tricky. If you're willing to cut a notch in
your battery cover, it gets easy. It takes a bunch of wiggling to get it to fit right,
but it will fit.
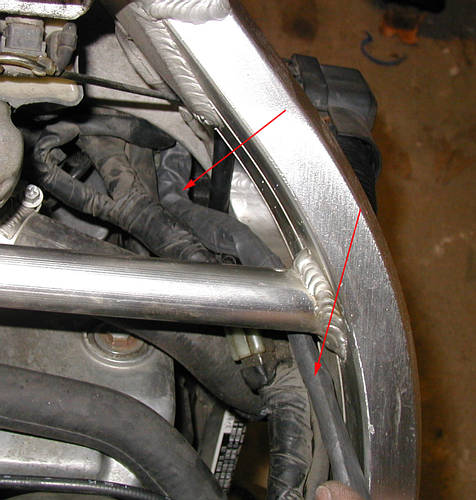
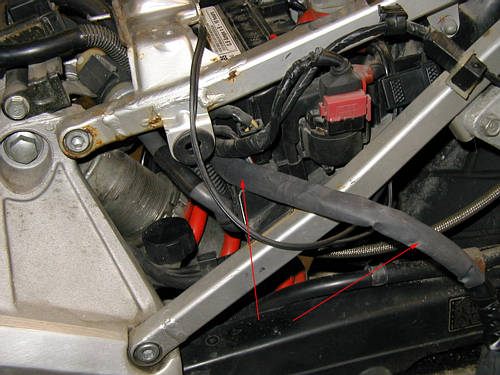
 There's only one cable tie that's really important, and that's the one that holds the
relays to the subframe. I can't really describe it in words, but here's a picture:
it's the one on the right. if you shove the thin end of the cable tie between the
subframe and the plastic fender piece it will come out at the hole above as shown.
I'd suggest mimicing this for best results.
There's only one cable tie that's really important, and that's the one that holds the
relays to the subframe. I can't really describe it in words, but here's a picture:
it's the one on the right. if you shove the thin end of the cable tie between the
subframe and the plastic fender piece it will come out at the hole above as shown.
I'd suggest mimicing this for best results.
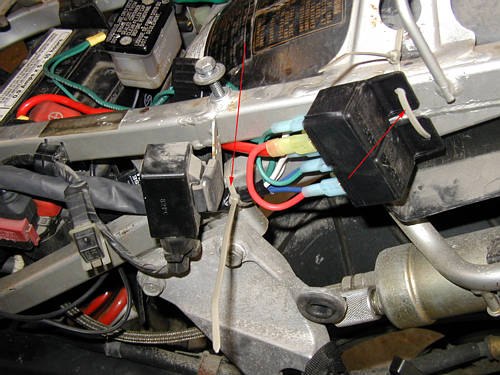 having said that, there's one more that is pretty important, and that's the one that
holds the harness to the subframe right next to the relays. See the above picture,
it's the one on the left.
All the rest of them are whatever looks right and keeps stuff from flapping.
I've included 8 cable ties, but I only used 5 on mine, save the extras for when
you need to cut one or mess up and need to re-do one.
Snip the tails off the cable ties, put everything back on, and then aim the headlight.
That's it.
If, on the off chance that you need to replace the relays, here's how they should be wired:
having said that, there's one more that is pretty important, and that's the one that
holds the harness to the subframe right next to the relays. See the above picture,
it's the one on the left.
All the rest of them are whatever looks right and keeps stuff from flapping.
I've included 8 cable ties, but I only used 5 on mine, save the extras for when
you need to cut one or mess up and need to re-do one.
Snip the tails off the cable ties, put everything back on, and then aim the headlight.
That's it.
If, on the off chance that you need to replace the relays, here's how they should be wired:
 Note that the hot is not attached to the common, but to 87, which is the normally open
connector. I did this so that when the relay isn't powered on there wouldn't be any
hot leads and I wouldn't have to shield pin 87a.
Here's a picture of the pinout of the relay:
Note that the hot is not attached to the common, but to 87, which is the normally open
connector. I did this so that when the relay isn't powered on there wouldn't be any
hot leads and I wouldn't have to shield pin 87a.
Here's a picture of the pinout of the relay:
 Remove the following:
- seat
- fuel tank
- rear cowling
- battery cover (if you have one)
Take note of the aim of the headlight using the little marks on the headlight
bracket (see picture), you're going to have to re-aim the headlight afterward,
and this will make it easier.
Remove the following:
- seat
- fuel tank
- rear cowling
- battery cover (if you have one)
Take note of the aim of the headlight using the little marks on the headlight
bracket (see picture), you're going to have to re-aim the headlight afterward,
and this will make it easier.
 Remove the headlight lens and loosen the headlight mounting bolts on the sides
so the headlight can move up and down. You'll need to wiggle the bucket around
to get the cables in, and having the headlight loose will make it easier.
Thread the blue plugs of the part that doesn't have the relays through the hole
in the headlight bucket from the inside and pull it through so the srinkwrap stops
at the hole (more or less)
The new harness has two connectors that should be bleeding obvious where they go.
Make sure that the one with the male plugs gets oriented properly, with the colors
matching up, and the plug tines matching, even the empty space.
The other one goes on the headlight (duh)
There isn't a lot of space inside the headlight bucket so you'll have to do some
masaging to get all the stuff inside and the reflector back on.
NOTE: The new female plug is especially tricky, there's only barely enough space
so you have to make sure that the three wires coming out of it don't cross or the
added thickness will prevent things from fitting. make sure they're flat on the edge
of the plug.
Remove the headlight lens and loosen the headlight mounting bolts on the sides
so the headlight can move up and down. You'll need to wiggle the bucket around
to get the cables in, and having the headlight loose will make it easier.
Thread the blue plugs of the part that doesn't have the relays through the hole
in the headlight bucket from the inside and pull it through so the srinkwrap stops
at the hole (more or less)
The new harness has two connectors that should be bleeding obvious where they go.
Make sure that the one with the male plugs gets oriented properly, with the colors
matching up, and the plug tines matching, even the empty space.
The other one goes on the headlight (duh)
There isn't a lot of space inside the headlight bucket so you'll have to do some
masaging to get all the stuff inside and the reflector back on.
NOTE: The new female plug is especially tricky, there's only barely enough space
so you have to make sure that the three wires coming out of it don't cross or the
added thickness will prevent things from fitting. make sure they're flat on the edge
of the plug.
 I did it like this and it worked, you may find that a different routing works for you,
but it's a good place to start.
DON'T FORCE THINGS! The bucket is plastic and can crack if you ham-fist it. It will
all fit, but it takes some work. It's the second hardest part of the installation.
Next route the harness down along the rest of the harness to the right side frame rail.
This is the hardest part. I did it without removing any pieces, but I was sorely tempted.
I did it like this and it worked, you may find that a different routing works for you,
but it's a good place to start.
DON'T FORCE THINGS! The bucket is plastic and can crack if you ham-fist it. It will
all fit, but it takes some work. It's the second hardest part of the installation.
Next route the harness down along the rest of the harness to the right side frame rail.
This is the hardest part. I did it without removing any pieces, but I was sorely tempted.
 IMPORTANT:
Make sure that the handlebars can move back and forth without the harness interfering.
IMPORTANT:
Make sure that the handlebars can move back and forth without the harness interfering.
 The rear half of the harness is easier to route.
From the left side of the bike stuff the plugs along the existing harness in front of the
battery box. It should just go through. The relays should sit flat against the left
subframe rail, with the green and red wires going through the "V" in the subframe,
BEHIND the vertical bracket thingie. You might have to twist the fuse around to get
it to fit through the space.
It will look like this now:
The rear half of the harness is easier to route.
From the left side of the bike stuff the plugs along the existing harness in front of the
battery box. It should just go through. The relays should sit flat against the left
subframe rail, with the green and red wires going through the "V" in the subframe,
BEHIND the vertical bracket thingie. You might have to twist the fuse around to get
it to fit through the space.
It will look like this now:
 Route the harness along the existing harness to the right frame rail where the front half
is waiting. I don't have an airbox, so I put mine on top of the existing harness, but
putting it underneeth should fit without trouble.
Route the harness along the existing harness to the right frame rail where the front half
is waiting. I don't have an airbox, so I put mine on top of the existing harness, but
putting it underneeth should fit without trouble.
 The front and rear plugs will fit together only one way, so long as you match up the wire
colors.
Attaching the cables to the battery is pretty straightforward, red to postitive, green
to ground/negative.
The next tricky part is routing the cables so they fit under the battery cover gracefully.
It's possible without cutting anything, but tricky. If you're willing to cut a notch in
your battery cover, it gets easy. It takes a bunch of wiggling to get it to fit right,
but it will fit.
The front and rear plugs will fit together only one way, so long as you match up the wire
colors.
Attaching the cables to the battery is pretty straightforward, red to postitive, green
to ground/negative.
The next tricky part is routing the cables so they fit under the battery cover gracefully.
It's possible without cutting anything, but tricky. If you're willing to cut a notch in
your battery cover, it gets easy. It takes a bunch of wiggling to get it to fit right,
but it will fit.
 There's only one cable tie that's really important, and that's the one that holds the
relays to the subframe. I can't really describe it in words, but here's a picture:
it's the one on the right. if you shove the thin end of the cable tie between the
subframe and the plastic fender piece it will come out at the hole above as shown.
I'd suggest mimicing this for best results.
There's only one cable tie that's really important, and that's the one that holds the
relays to the subframe. I can't really describe it in words, but here's a picture:
it's the one on the right. if you shove the thin end of the cable tie between the
subframe and the plastic fender piece it will come out at the hole above as shown.
I'd suggest mimicing this for best results.
 having said that, there's one more that is pretty important, and that's the one that
holds the harness to the subframe right next to the relays. See the above picture,
it's the one on the left.
All the rest of them are whatever looks right and keeps stuff from flapping.
I've included 8 cable ties, but I only used 5 on mine, save the extras for when
you need to cut one or mess up and need to re-do one.
Snip the tails off the cable ties, put everything back on, and then aim the headlight.
That's it.
If, on the off chance that you need to replace the relays, here's how they should be wired:
having said that, there's one more that is pretty important, and that's the one that
holds the harness to the subframe right next to the relays. See the above picture,
it's the one on the left.
All the rest of them are whatever looks right and keeps stuff from flapping.
I've included 8 cable ties, but I only used 5 on mine, save the extras for when
you need to cut one or mess up and need to re-do one.
Snip the tails off the cable ties, put everything back on, and then aim the headlight.
That's it.
If, on the off chance that you need to replace the relays, here's how they should be wired:
 Note that the hot is not attached to the common, but to 87, which is the normally open
connector. I did this so that when the relay isn't powered on there wouldn't be any
hot leads and I wouldn't have to shield pin 87a.
Here's a picture of the pinout of the relay:
Note that the hot is not attached to the common, but to 87, which is the normally open
connector. I did this so that when the relay isn't powered on there wouldn't be any
hot leads and I wouldn't have to shield pin 87a.
Here's a picture of the pinout of the relay: